Professional Ship Simulator Keyboard and Gamepad Layout
A local copy of the official US keybind sheet plus how to survive fifty-plus actions.
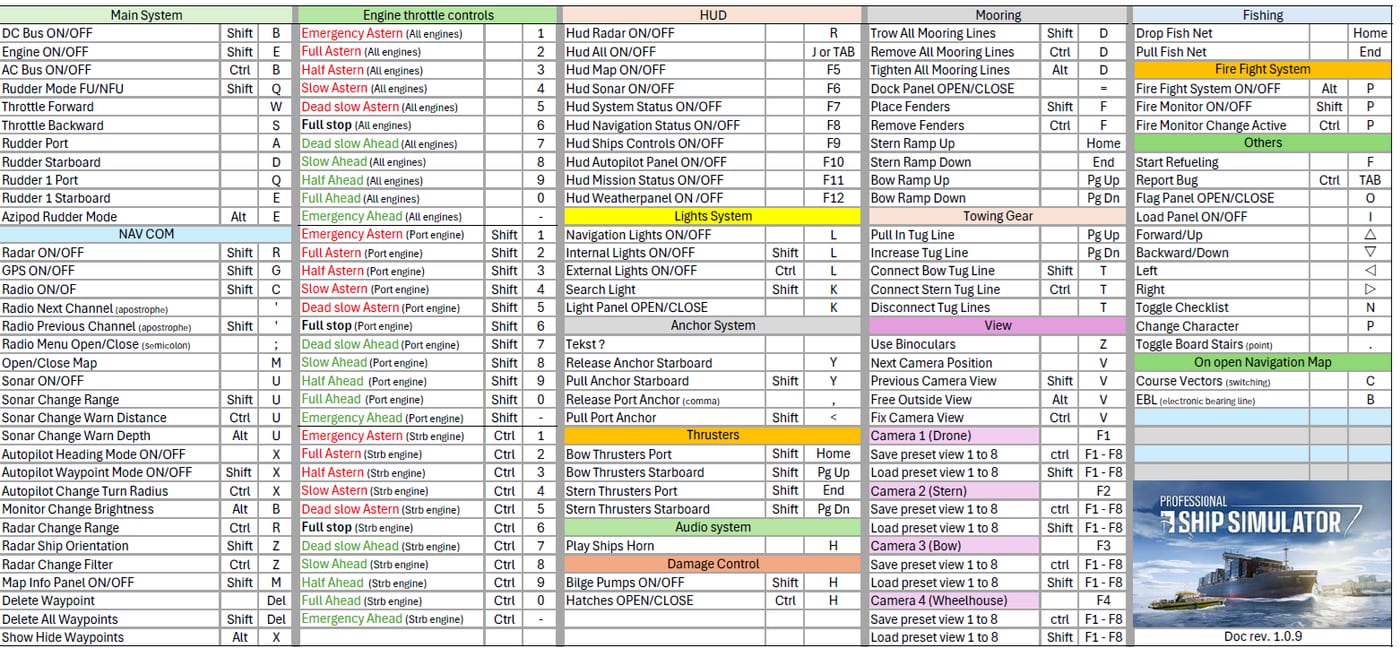
This is the pin-to-second-monitor page. SWE Systems published a US keyboard overview (Keybind_US_V0.9) and a first-pass gamepad sheet on nauticxp.com. We keep a local image so you are not searching a blog mid-berth. For the why, read controls. For the first cold start, read getting started.
The graphic below is a downloaded copy of the official sheet, resized for the wiki. If the developers post v1.0 after 16 September 2026, we will replace this file. Until then, also open the in-game checklist — it always matches your current profile, including rebinds.
How to read the triple layer
The keyboard is not WASD-plus-a-few. Official copy describes three layers and more than fifty mappable actions, plus nine analogue axes if you own hardware. One layer is helm and camera. One is systems (power, lights, pumps, radio). One is specialised gear (winches, nets, monitors). If a key “does nothing,” you are probably on the wrong layer or the batteries are still off.
Use this sheet to learn categories, then rebind. A German-studio default will not match every laptop. Per-ship profiles exist — a tug on dual sticks should not inherit a cruise-ship throttle map.
High-traffic actions to locate on the sheet and in the checklist:
- Camera cycle and camera nudge (arrows / hat).
- Heading-lock versus free look.
- Thruster left/right for bow and stern.
- Telegraph / throttle and astern.
- M for the chart (creators and tutorials agree on this one).
- Autopilot engage (often X in creator videos; confirm in your checklist).
- Radio, binoculars, anchor, lines.
- The “show keys” helper (demo streamers mention N).
Mouse remains part of the layout. Clickable cockpits and HUD tiles are faster than hunting a third-layer key while a quay grows large in the window. Sit so you can reach mouse, throttle, and the sheet without standing up.
Gamepad and sticks
Steam lists partial controller support. Aerosoft’s download page posted a first gamepad layout in August 2026 — get the latest PDF from official links if you play from a couch. Typical pattern:
- Analogue helm and throttle on sticks or triggers.
- Hat for camera nudge.
- Modifier (“special left” in the official tutorial) to highlight HUD systems.
- Face button to confirm a thruster direction.
Nine advertised axes are the reason a cheap digital pad feels rough. If you own a throttle quadrant or a USB wheel, map wheel, throttle, bow thruster, and stern thruster first. Buttons second. Small deadzones. Bank effect already delays the hull; a sticky stick doubles the delay.
You will still want a mouse for radio and cargo sliders. A gamepad-only career is possible for open-water legs and painful in a lock.
Keep it next to the other tools
Print this page or keep it on a phone. Combine it with system requirements on launch night. When you are ready to apply the binds, run a boring docking drill on a beginner ship instead of a Dover tanker.
If a patch shuffles defaults, check the updates hub and the nauticxp.com downloads page. This wiki will not invent binds that are not on a public sheet.
Frequently Asked Questions
Quick answers before you take the helm.
Is this the official keybind sheet?
It is a locally stored copy of the US v0.9 graphic published by the developers. The in-game checklist is still the live authority.
Where is the gamepad PDF?
On the official nauticxp.com downloads page. We summarise it here; get the latest file from official links if they increment the version.
Can I rebind everything?
The sim is built around custom mapping, including per-ship profiles. Rebind early.
Why does X not start autopilot?
Your profile may differ, or engines are not clutched in. Check the checklist panel and the how-to-play autopilot section.